Monday, September 5, 2011

Not Too Shabby

Hello peeps!

Hope everyone is well!  Things have been a bit exciting for us this week as our son is getting closer to becoming fully potty trained.  Well, my poor cat might not use the word 'exciting.'  We all know that cats don't enjoy getting wet on the best of days, but an unexpected little shower as she wandered across the bathroom was a whole new level of insult...

But speaking of exciting - I am very excited to share my latest creation with you.  I was very inspired by a shabby chic tutorial I saw on the Stampartic blog and I knew the moment I saw it that I wanted to give it a try.  Luckily, there were a couple of shabby chic challenges this past week with even more great inspiration and examples, so I just had to make a card.  This really is quite a different style than I am used to and I found it very challenging. 
Supplies:

Stamps - Silent Night Tilda (Magnolia) and Bells and Boughs (Stampin' Up)
Paper - Bazzill and Stampin' Up card, 300g watercolour paper and Bo Bunny Midnight Frost DP
Ink/Colouring - Stazon (black), Distress inks (walnut stain, antique linen, pumice stone, weathered wood, stormy sky, black soot, forest moss), watercolour pencil (skin), Distress Stain (picket fence) and Adirondack Mixatives (snow cap)
Other - Distress stickles (rock candy), pearls (stash), Tim Holtz ribbons, Stampin Up snowflake die, Spellbinders fancy tags 2, jingly bells (found in my stash), crochet lace (from a friend's garbage - no that isn't a brand name; a friend of mine actually threw that out after using part of it on a scrapbook layout), cotton fabric (from my old curtains), liquid applique (unheated because I'm a bit of a chicken and was afraid I would wreck my image and I liked how it looked without heating it) and I think that is all.

Tilda's close up:
And an artsy view:
I would like to enter my card in these challenges:

Stampartic - Shabby Chic
Top Tip Tuesday - Shabby Chic
(my tip - Picket fence Distress Stain is the perfect product to use on porous surfaces to create the white washed look commonly found in the shabby chic style.  I used it on the blue snow flakes and the crochet lace - it is sooo easy to use!  Adirondack Mixatives in snow cap is the perfect product to use on metal to give it that painted white look that is also common to shabby chic.  I used it on the jingly bells, which started out gold.)

ABC Christmas Challenge - R is for recycling and ribbon or rhinestones (I recycled my old curtains)
Magnolia Down Under - frame it (I framed my image with TH ribbon; hope this counts!)
Just Magnolia - Anything goes with optional circles
Simon Says Stamp/Simon Says Stamp and Show - Anything goes and a fun blog hop

Thank you so much for visiting and taking the time to leave a comment - I really appreciate them!  Have a great week! 

Hugs,

Dawn


Monday, August 29, 2011

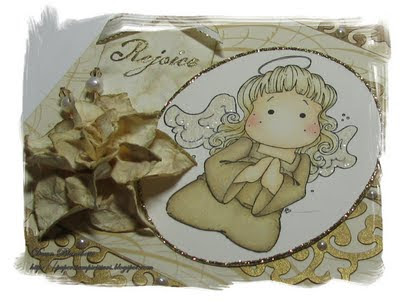
All that Glitters is Gold

Hello all,

Hope you are well!  I have another card to share and it has been less than a week since my last post!!  Well, last night's dishes are still sitting on the counter... but what can you do when inspiration strikes?  Or is it fear as I realized how many cards I still have to make before Christmas and how few weeks there are remaining?  In spite of this self-inflicted pressure, since taking time off from blogging for my surgery, I have been doing quite a bit better at balancing my life out - no more crazy nights of crafting until 3am and no more tired cranky mom the next day.  As for the dishes, they will still be there tomorrow (unfortunately).

I was really inspired by several challenges to make a different card this time.  I know, if you look at my last post, you might counter that it really isn't all that different.  However, this is my first truly monochromatic card and it is the first time I have used shimmering gold paint.  Actually, I'm not really a fan of gold, so it is also one of the few gold cards I have ever made.  Despite it being gold, I am quite pleased with the result:


Some details:

Stamps - I used Angel Tilda (again - I know); I'll try for some more variety on the next one.  The sentiment is from the Hot Off the Press Christmas Stamp and Punch set and has been embossed with gold embossing powder.
Paper - Anna Griffin, Stampin Up vanilla card to make embellishments, Bazzill for the base(I think) and shimmery gold card.
Colouring - The little cutie is coloured with Distress inks (antique linen, scattered straw, frayed burlap and tattered rose) a watercolour pencil for the skin tone and I added Royal Tempera gold paint to the DI for her gown.  Wings were given a lite colour wash and then filled in with Distress Stickles in clear rock candy.
Other - Gold Stickles frame the image.  The die cuts are Spellbinders Parisian Accents and the tag is a Marvy punch which I distressed with antique linen.  Cream flat-backed pearls are from Kaiser.  I dipped into my jewelry making supplies to create my own pins using freshwater pearls and 4mm bicone Swarovsky crystals in lite colorado - so this card will definitely have to be for someone extra special!  The flower is another of my own creations.  I have promised flower tutorials, so for those interested, a how-to follows at the end of this post.

Tilda's close-up - hope the shimmery gold shows on her gown:


And the artsy view:
 This card was inspired by the following challenges:

Christmas Stampin' All Year Long - monochromatic
Just Magnolia - bingo (I couldn't decide, so I did 2 lines - embossing, flower, pins and gems distress and pins)
Jingle Belles - Midas touch (only gold, silver, white and cream allowed)
Magnolia-licious Challenge - photo inspiration (I went with the colours in the gold and cream purse)
Simon Says Stamp Challenge - for the gorgeous and easy to use sketch
Magnolia Down Under Challenge - texture
Bah! Humbug! - here come the girls (what girl doesn't love pearls and crystals?)

And now for the flower how-to.  There are a lot of photos, so it may take a while to upload :(

Cut three flowers, one at 2.5 inches and two at 2 inches out of thin cardstock.  I cut my flowers with my Straight from the Nest cricut cartridge out of Stampin Up vanilla card. 
Find the centres and mark them with a dot.  Enhance each petal by cutting it deeper toward the centre marking. 
Mist the flowers with water and when they are damp crumple then into tight little balls.  This gives a nice distressed look. 
Gently uncrumple and lay flat. 
To add colour, press ink pad onto craft mat and mist with a little water.  I used DI antique linen again.  Press flowers into ink; they will naturally become darker in the deepest creases.  Dry slightly with a heat tool and repeat until the desired effect is achieved.  Once you are done applying colour, dry flowers slightly, making sure they are still a bit damp - they should be easy to manipulate, but not so wet that they break apart. 
Shape the largest and one of the smaller flowers gently, turning and curling petals until you are pleased with the result. 

The other small flower will be used to make the centre.  Curl/role one of the petals completely into a tight upside down cone. 
Then continue curling so the other petals wrap around it.  There should be three petals wrapped around - remove the last petal by tearing it off.  Again, gently shape and overlap the petals until you are happy with the final result.  Allow to dry completely (you can use a heat tool for this if you are in a rush. 
Once they are dry, punch a whole in the centre of the smaller flower and apply glue (I used Glossy Accents). 

The centre flower is then slid down into the whole to create the first layer.  Once the glue is dry, snip off about half of the tail that sticks out underneath.
Apply glue to the center of the largest flower and gently press the remainder of that tail into the glue to create the final layer.  Embellish your flower as you please and you are done.

If you are still here, thank you so much for visiting.  Thank you also for taking the time to leave me a comment - I appreciate them all.  Hope you've enjoyed my card and have a great day!

Hugs,

Dawn

Wednesday, August 24, 2011

Christmas Angel

Greetings Bloggers,

Eeeek! It's been a while!  So long in fact, I couldn't remember how to update my blog.  But I have finally been able to get back into my craft space to create a card.  December is a very hectic month with Christmas and family birthdays so I thought I would try to get ahead on Christmas cards to make life a little easier leading up to the holidays.  Here is my card:

Some details:

Stamps - Angel Tilda, Hot Off the Press Christmas Stamp and Punch (sentiment)
Paper - Bazzill card, Bo Bunny Midnight Frost and 300 g hot pressed watercolour paper
Colouring - 'painted' with Distress inks - tattered rose, antique linen, walnut stain, stormy sky and a watercolour pencil for skin tone
Other - McGill pine branch punch, Nellie Snellen corner die (inked with embossing ink and embossed with Stampin' up iridescent ice), Stickles rock candy and star dust, and the flower is my own creation using a 5 petal flower from my Straight From the Nest Cricut cartridge.  I think this is my favourite flower creation to date.  I cut the flower 3 times - 1 at 2.5 inches and 2 at 2 inches.  Mist with water and crumple.  Carefully uncrumple and add colour if you are going to (I used stormy sky distress ink and Tattered Angels glimmer mist in bubbles).  The paper was too moist to work at this point, so I dried it partially with my heat gun.  Once it was just slightly damp, I shaped the petals and allowed to dry completely.  Once dry, I layered the three flowers together.

My card is for these challenges:

CSAYL - non-traditional colours (no red or green)
Magnolia Stamp Lovers - flowers
Bah! Humbug! - something new (my hot off the press Christmas stamp set)
Magnolia-licious Highlights - only paper (which was really difficult!)


Thanks for stopping by and taking the time to leave a much appreciated comment.  I'll definitely pop by to visit you too!

Hugs,

Dawn

Friday, July 8, 2011

Hello (Vintage) Kitty

Hello bloggers,

Hope everyone had a swell week!  I first of all want to extend a huge thanks to the new gals who have started following my blog!  I am so glad to have you along!

A quick post today as life is a bit hectic at the moment.  It is Friday and time for a brand new challenge at Crafty Catz!  This week, the lovely Dianne is hosting and she has chosen a vintage theme.  So, this week we would love to see vintage cards.

Our wonderful sponsor this week is Robyn's Fetish, who kindly provided the team with a digital paper pack for our cards.  The pack included patterned papers as well as coordinating coloured solid papers, which is great for adapting the papers to whatever you happen to need for your project.  For my card, I used a patterned paper as the base, and then stamped and embossed on a coordinating solid for the next two layers, respectively.  Here is what I came up with:

Supplies:

Cardstock - Bazzill and Stampin' Up
Papers - Digital pack from Robyn's Fetish
Stamps - Stampavie - Hello! from Lawrence collection; Tim Holtz - Urban Chic; sentiment from Hot Off the Press - Labels and Frames
Ink - Stazon - black; Distress inks - tattered rose, pumice stone, antique linen, walnut stain, milled lavender, dusty concord
Other - circle punches for flowers, pearls, cream lace from Kaiser, Marvy tag punch, brass butterflies by Vintaj Natural Brass Co., foam spirals from Magnolia, Stampin' Up antique brad, glimmer mist by Tattered Angels, Tim Holtz Fancy and Floral Frames embossing folder, ribbon from stash.

If you are looking for more inspiration, be sure to check out the wonderful vintage cards my teamies have created.  I hope you will be able to join us this week and look forward to seeing your projects!

I would also like to submit this card for the following challenges:

Stamptacular Sunday - seeing double (two butterflies, two spirals and two sets of pearls)
Charisma Cardz - all about flowers
Craft us Crazy - Christmas in July and/or vintage
Papertake Weekly - anything goes

Thank you so much for stopping by!  I really appreciate your comments; thanks for taking the time to leave them!  Have a great weekend!

Hugs,

Dawn

Friday, July 1, 2011

What's Up?

Hello bloggers,

Happy Friday!  Hope everyone had a great week.  Before I tell you about my card or this week's challenge, I want to send a huge thank you to my new followers - I am so glad to have you along! 
Onto this week's new challenge at Crafty Catz - it is the lovely Carol's turn to host and she has chosen the colours of summer for our challenge.  Digital Delights, our sponsor for this week, has provided us with some cute images to play with and I chose Scrubby Ted for my card.

True to life, this guy got the gorgeous eyelashes - so not fair!  I coloured him with pencils and cut him out.  I made a background on watercolour paper to look like a setting sun (distress inks rusty hinge, spiced marmalade, pine needles and broken china) on a sandy beach and glued him over top.

Other materials used:

Cardstock - Bazzill
Papers - Inque boutique (from a few years ago) and Imaginisce (Splash dance)
Other - surfboard is paper covered chipboard (Inque boutique for both); pearls; sand; flowers - are cut from Straight from the Nest Cricut cartridge, distressed, inked with vintage photo and misted with Tattered Angels Glimmer Mist in Bronze; sentiment is computer generated.  Think that is it.

The artsy view:
One lucky randomly selected winner will receive 3 digital stamps of their choice from Digital Delights.  I hope you will be able to join us!  If you are looking for more inspiration, please check out the wonderful creations of my fellow teamies - they are sure to get your mojo going!

I would also like to enter this card in the following fun challenges/linky party:

Craft Us Crazy - Red, white and blue and/or summer
Papertake Weekly - Sketch
Make it Monday - Anything goes
Stampin' for the Weekend - My favourite things (some of mine are beaches with soft white sand, making my own flowers, flourishes, pearls and designer papers)
Top Tip Tuesday - T is for ? (I have a Teddy bear, Three flowers, Tim Holtz distress inks, and the colours Tangerine and Turquoise, oh - and the teddy is also holding a Towel! and I just noticed I also have Three designer papers too)
My Tip: To make your own dimensional flowers, mist your die/punch/electronically cut flowers with water until they are quite moist.  Crumple them up to give them texture and then gently un-crumple them, leaving the amount of 'wrinkling' desired.  Shape them gently, curling the petals up or down.  Allow to dry thoroughly and then layer, add center pieces and/or glitters/mists.  The dried flowers will have wonderful texture and will be very firm, keeping their shape very nicely.  Now, hopefully I remember to add Tip by my name! :o)

Thank you so much for stopping by and for taking the time to leave a comment.  I so appreciate them and it gives me the chance to visit your blog too!

Hugs,

Dawn